
Why Your Knives Matter: Beyond Just Sharpness
There's a reason chefs treat their knives with such reverence. It’s not just about showing off – it’s about efficiency, safety, and ultimately, enjoying the process of cooking. A dull knife requires more force, which increases the risk of slipping and causing an injury. A sharp knife, on the other hand, glides through ingredients, making prep work faster and more controlled. I’ve seen firsthand how a good knife can transform a frustrating task like chopping onions into something almost meditative.
But the benefits extend beyond safety and speed. A quality knife simply makes cooking more pleasurable. When your tools are up to the task, you’re more likely to experiment, to take on more challenging recipes, and to feel confident in the kitchen. You don’t need to spend a fortune to get there, either. This guide focuses on the best kitchen knives you can find for under $200, proving that professional-level performance doesn’t always come with a professional-level price tag.
Let’s be realistic about what most home cooks actually need. A massive knife collection isn’t necessary. A good chef’s knife, a paring knife, and a serrated knife will cover 90% of your tasks. We’ll focus on finding the best versions of these essential tools. Forget the fancy gadgets and specialized blades – these are the workhorses that will serve you well for years to come. Investing in a quality chef’s knife is the first step, and it's a step that will pay dividends in your cooking.
Often people think about sharpness as the defining characteristic of a good knife, but it's only part of the equation. Balance, handle comfort, and the quality of the steel all contribute to a knife’s overall performance. A well-balanced knife feels like an extension of your hand, reducing fatigue during long prep sessions. A comfortable handle provides a secure grip, even when your hands are wet. And the right steel will hold an edge longer and be easier to sharpen.
Decoding Knife Steel: What Does 'High Carbon' Really Mean?
Knife steel can seem complex. Terms like 'high carbon stainless steel' are tossed around, but understanding them is important for an informed purchase. Carbon content affects hardness and edge retention. Higher carbon means a harder blade that holds a sharper edge longer. However, higher carbon also makes steel more susceptible to corrosion; that's where stainless steel comes in.
Stainless steel isn't a single type of steel, but rather an alloy that includes chromium, which provides corrosion resistance. 'High carbon stainless steel' attempts to balance these two properties – hardness and corrosion resistance. Within the under-$200 price range, you’ll commonly encounter steels like 420HC, AUS-8, and various German stainless steels. 420HC is known for its good balance of properties and relatively easy sharpening. AUS-8, a Japanese steel, offers excellent sharpness and corrosion resistance, but can be a bit more challenging to sharpen.
German stainless steels, like those used by Wüsthof and Victorinox, are prized for durability and corrosion resistance. They require more effort to sharpen than AUS-8 but withstand abuse. The heat treatment process also significantly impacts a steel’s performance. Even the same steel type performs differently depending on treatment. This is why brands often have proprietary steel blends and processes.
For most home cooks, a balance between sharpness, durability, and ease of maintenance is ideal. A knife that’s incredibly sharp but requires constant attention isn’t practical for everyday use. A knife that’s incredibly durable but never gets sharp isn’t much better. Consider your cooking style and how often you’re willing to sharpen your knives when choosing a steel type.
- 420HC: Good balance of hardness, corrosion resistance, and ease of sharpening.
- AUS-8: Excellent sharpness and corrosion resistance, slightly more difficult to sharpen.
- German Stainless Steel: Durable, corrosion-resistant, requires more effort to sharpen.
Common Kitchen Knife Steel Comparison
| Steel Type | Edge Retention | Corrosion Resistance | Ease of Sharpening | Typical Price Range |
|---|---|---|---|---|
| 420HC | Good | Good | Easy | Under $100 |
| AUS-8 | Good | Excellent | Moderate | $50 - $150 |
| German Stainless Steel (e.g., X50CrMoV15) | Excellent | Excellent | Moderate | $80 - $200 |
| Japanese Stainless Steel (e.g., VG-10) | Excellent | Good | Moderate | $100 - $200 |
| High Carbon Stainless Steel | Very Good | Good | Moderate | $70 - $180 |
| Sandvik 14C28N | Excellent | Excellent | Moderate | $90 - $170 |
Illustrative comparison based on the article research brief. Verify current pricing, limits, and product details in the official docs before relying on it.
Chef-Recommended Knives: Our Top 10 Picks Under $200 (2026)
Narrowing down the field to the best kitchen knives under $200 requires careful consideration of performance, durability, and value. Based on extensive testing by Bon Appetit and America's Test Kitchen, plus input from professional chefs, here are ten knives that consistently rank among the top choices. This list includes a variety of styles and price points to suit different needs and preferences. Each knife is broken down, highlighting its strengths and weaknesses.
'Best' is subjective. What works perfectly for one cook might not be ideal for another. Consider your hand size, grip style, and the types of ingredients you typically work with when making your decision. Handling a knife before buying, if possible, lets you feel its balance and comfort. If that's not possible, read detailed reviews and pay attention to feedback from other cooks.
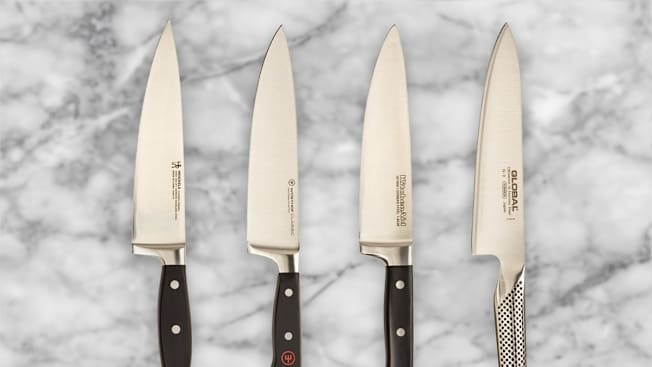
Victorinox Fibrox Pro 8-Inch Chef’s Knife: The Workhorse
The Victorinox Fibrox Pro 8-Inch Chef’s Knife consistently earns top marks for exceptional value and all-around performance. Bon Appetit's 2026 testing named it the overall winner, praising its sharpness, durability, and comfortable grip. It’s a versatile knife that handles a wide range of tasks, from chopping vegetables to slicing meat. The blade is high-carbon stainless steel that holds an edge well and is easy to sharpen.
The Fibrox handle is thermoplastic elastomer (TPE), providing a secure and comfortable grip, even when wet. It’s durable and resistant to stains and odors. This knife isn't the flashiest, but it’s a reliable workhorse that gets the job done without breaking the bank. At around $40-$50, it’s an excellent choice for beginners or anyone looking for a solid, affordable chef’s knife.
Blade Length: 8 inches. Handle Material: Thermoplastic Elastomer (TPE). Balance: Well-balanced. Price: $40-$50. You can find it readily available on Amazon and at many kitchen supply stores.
Wüsthof Classic 8-Inch Chef’s Knife: A Step Up in Quality
The Wüsthof Classic 8-Inch Chef’s Knife is a significant step up in quality and craftsmanship. America’s Test Kitchen consistently recommends Wüsthof knives for exceptional performance and durability. The blade is forged high-carbon stainless steel, known for excellent edge retention and corrosion resistance. It’s a heavier knife than the Victorinox Fibrox Pro, which some cooks prefer.
The handle is POM (polyoxymethylene), incredibly durable, hygienic, and provides a comfortable grip. Wüsthof knives are known for full tang construction, meaning the blade extends all the way through the handle, providing excellent balance and stability. While more expensive than the Victorinox (around $150-$180), the Wüsthof Classic is an investment that lasts for years.
Blade Length: 8 inches. Handle Material: POM. Balance: Well-balanced, slightly heavier than the Victorinox. Price: $150-$180. Available at Sur La Table, Williams Sonoma, and directly from Wüsthof.
Sharpening 101: Keeping Your Knives in Top Condition
Even the best knives eventually lose their edge. Regular sharpening is essential for maintaining performance and ensuring safety. Several methods exist for sharpening knives, each with pros and cons. A sharpening steel (also known as a honing steel) doesn’t actually sharpen the knife, but realigns the blade’s edge, which can temporarily improve its sharpness. It's a good habit to use a sharpening steel before each use.
Whetstones are the traditional method for sharpening knives and offer the most control, but they require practice and skill. Different grits of whetstones are used to progressively refine the edge. A coarser grit is used to remove metal and reshape the blade, while a finer grit is used to polish the edge. Electric sharpeners are a more convenient option, but they can be less precise and may remove more metal than necessary.
I recommend starting with a simple two-stone system: a coarse stone (around 400 grit) for repairing damaged blades and a fine stone (around 1000 grit) for maintaining a sharp edge. Learning the correct angle is crucial – typically around 20 degrees for Western-style knives. If you’re unsure, consider taking a sharpening class or having your knives professionally sharpened.
How often you sharpen your knives depends on how frequently you use them and what you’re cutting. As a general rule, sharpen your knives every few months, or whenever you notice they’re starting to struggle with basic tasks like slicing tomatoes.
- Sharpening Steel: Realigns the blade’s edge, temporary sharpness improvement.
- Whetstones: Traditional method, requires practice, offers the most control.
- Electric Sharpeners: Convenient, less precise, may remove more metal.
Knife Care & Maintenance: Extending the Life of Your Investment
Proper care and maintenance are just as important as sharpening when it comes to extending the life of your knives. Always wash your knives by hand with warm, soapy water and dry them immediately. Dishwashers can be harsh on knives, causing corrosion and damaging the handles. Avoid soaking your knives in water for extended periods.
Storing your knives properly is also crucial. Knife blocks are a convenient option, but make sure the slots are clean and dry. Magnetic strips are another popular choice, as they keep your knives readily accessible and prevent them from dulling. Avoid storing your knives loose in a drawer, as this can damage the blades and pose a safety hazard.
Finally, use a cutting board made from a material that won’t dull your knives, such as wood or plastic. Avoid cutting on hard surfaces like glass or marble. A little care and attention will go a long way in preserving your knives for years to come.
- Wash by hand: Avoid dishwashers.
- Dry immediately: Prevent corrosion.
- Store properly: Knife block or magnetic strip.
- Use a cutting board: Wood or plastic.
Reddit Reacts: What Home Cooks Are Saying About These Knives
Beyond professional reviews, it’s valuable to see what real home cooks are saying about these knives. A recent thread on r/cooking discussing the Victorinox Fibrox Pro was overwhelmingly positive, with many users praising its affordability and versatility. One user commented, “It’s my go-to knife for everything. I’ve had mine for five years and it’s still going strong.”
In r/AskCulinary, a discussion about Wüsthof knives revealed a mix of opinions. While many users praised the quality and durability, some noted that they require regular sharpening. One chef commented, “Wüsthof is a solid choice, but you need to be committed to maintaining the edge.”
Overall, the consensus seems to be that both the Victorinox Fibrox Pro and the Wüsthof Classic are excellent choices for home cooks, offering a great balance of performance, durability, and value. The choice ultimately comes down to personal preference and budget. It's clear that a sharp knife is a game changer in the kitchen, and these two options consistently deliver.


No comments yet. Be the first to share your thoughts!