
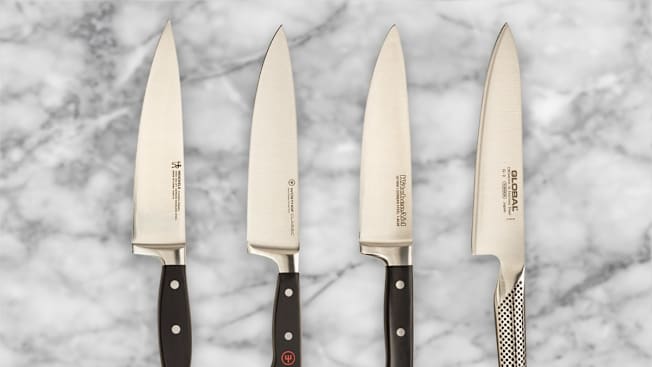
The state of kitchen knives in 2026
You can spend $50 or $300 on a chef's knife, and while the price gap is huge, the actual quality available to home cooks has never been higher. You don't need a 20-piece block; you need one blade that fits your hand and holds an edge.
Right now, we're seeing a lot of innovation in steel types. High-carbon stainless steel remains the most popular choice, offering a good balance of sharpness, durability, and corrosion resistance. However, more and more cooks are exploring the benefits of carbon steel, which can achieve an incredibly sharp edge but requires more maintenance to prevent rust. Ceramic knives are also still around, offering exceptional sharpness and resistance to corrosion, but they're brittle and best suited for specific tasks.
Handle materials are also evolving. Traditional wood handles are still prized for their beauty and comfort, but synthetic materials like G10 and Micarta are gaining traction due to their durability and resistance to moisture. Construction methods are also becoming more refined, with many brands focusing on full-tang construction (where the blade extends the full length of the handle) for improved balance and stability. It's a lot to consider, but a little research can help you cut through the noise and find the perfect blade for your kitchen.
Beyond the Chef’s Knife: Essential Additions
While a chef’s knife handles the bulk of kitchen tasks, a few other knives will significantly improve your efficiency and versatility. America's Test Kitchen consistently recommends three knives alongside the chef's knife: a paring knife, a serrated knife, and a utility knife.
Paring Knife: Ideal for small, delicate tasks like peeling fruits and vegetables, trimming meats, and deveining shrimp. The Victorinox Swiss Classic Paring Knife ($10 - $15) is a fantastic, affordable option. For a step up in quality, consider the Wüsthof Classic Paring Knife ($40 - $60).
Serrated Knife (Bread Knife): Essential for slicing bread, tomatoes, and other foods with a tough exterior and soft interior. The Mercer Culinary Millennia Bread Knife ($20 - $30) offers excellent value. If you're willing to spend more, the Shun Classic Bread Knife ($150 - $200) provides exceptional performance.
Utility Knife: A smaller version of the chef’s knife, useful for tasks that are too small for a chef’s knife but too large for a paring knife. The Victorinox Fibrox Pro Utility Knife ($20 - $30) is a reliable and affordable choice. It fills a nice niche without breaking the bank.
Top Chef’s Knife Picks for 2026
| Brand | Model | Steel Type | Handle Material | Best For |
|---|---|---|---|---|
| Wüsthof | Classic 8-Inch Chef’s Knife | X50CrMoV15 | Synthetic Material (Durable & Hygienic) | All-around versatility; a workhorse in the kitchen 🥩 |
| Shun | Classic 8-Inch Chef’s Knife | VG-MAX | PakkaWood | Precise slicing & dicing; beautiful aesthetics ✨ |
| Global | G-2 8-Inch Chef’s Knife | CROMOVA 18 | Stainless Steel | Modern style & lightweight feel; easy to maintain |
| Victorinox | Fibrox Pro 8-Inch Chef’s Knife | Stainless Steel | Fibrox (Rubberized) | Budget-friendly option; excellent grip even when wet 💧 |
| Miyabi | Kaizen II 8-Inch Chef’s Knife | VG10 | Birchwood | Exceptional sharpness & edge retention; Japanese craftsmanship |
| Tojiro | DP Gyuto 8.2-Inch Chef’s Knife | VG-10 | Pakkawood | Excellent value for a high-performance knife; good for beginners |
Qualitative comparison based on the article research brief. Confirm current product details in the official docs before making implementation choices.
Handle Materials: Comfort and Control
The handle is your interface with the knife, so comfort and control are crucial. Wood handles (such as rosewood, pakkawood, and walnut) are aesthetically pleasing and provide a warm, natural feel. However, they require more maintenance to prevent cracking and warping.
Synthetic materials like G10 and Micarta are more durable and resistant to moisture. They offer a secure grip, even when wet, and are relatively low-maintenance. These materials are becoming increasingly popular for their practicality.
Rubber or plastic handles are often found on more affordable knives. They provide a good grip but may not be as comfortable or durable as wood or synthetic materials. The key is to find a handle that feels comfortable in your hand and provides a secure grip.
Knife Care and Maintenance
Proper knife care will extend the life of your blades and keep them performing at their best. Sharpening is essential, and there are several methods available. Whetstones require practice but offer the most precise control. Electric sharpeners are more convenient but can be more aggressive. Honing steels don't actually sharpen the blade but realign the edge.
Cleaning should be done immediately after use with warm, soapy water. Avoid using abrasive cleaners or putting knives in the dishwasher. Always dry the knife thoroughly before storing it. Storage is also important. Knife blocks are a convenient option, but magnetic strips are preferred by many professionals as they prevent the blade from dulling.
A common mistake is storing knives loose in a drawer, which can damage the blade and pose a safety hazard. Another is using knives on hard surfaces like glass cutting boards, which can quickly dull the edge. Investing in a good cutting board (wood or plastic) is a worthwhile investment.
- Sharpen regularly (whetstone, electric sharpener)
- Hone after each use
- Wash immediately with warm, soapy water
- Dry thoroughly
- Store properly (knife block or magnetic strip)
Knives Worth a Closer Look
While the knives listed above represent our top picks, there are a few other options that deserve consideration. The Miyabi Kaizen II Chef’s Knife ($250-$300) offers a beautiful design and excellent performance, with a focus on traditional Japanese craftsmanship.
For those seeking a more affordable option than the Shun Classic, the Tojiro DP Gyuto ($100-$150) provides exceptional value and sharpness. It's a great entry point into Japanese-style knives.
Finally, the Messermeister Meridian Elite Chef’s Knife ($180-$230) is a durable and well-balanced option that's often overlooked. It's a solid all-around performer that will serve you well for years.


No comments yet. Be the first to share your thoughts!