
Welcome to Pressure Cooking: Understanding Your Instant Pot
The Instant Pot has become a kitchen staple, but it’s more than just a trend. It's an electric pressure cooker, and understanding what that is is the first step. Pressure cooking uses steam to raise the internal temperature, which cooks food faster than a stove or oven. This happens because the increased pressure raises the boiling point of water. It’s a really effective way to tenderize tough cuts of meat or quickly cook beans, but it’s not a magical shortcut—it still requires a bit of know-how.
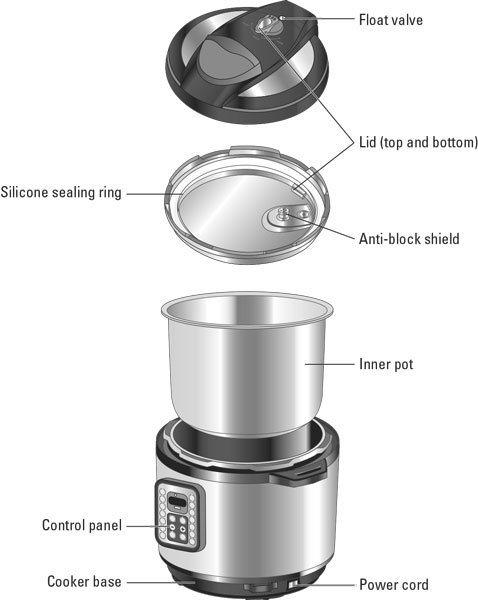
An Instant Pot consists of a few key components: the inner pot (where the food goes), the outer housing, the lid with a sealing ring, a steam release valve, and a control panel. Different models offer varying features. The Instant Pot Duo is a popular entry-level model, offering basic pressure cooking, slow cooking, and sautéing functions. The Pro and Max models add features like more precise temperature control and built-in programs for specific foods. For a beginner, the Duo is perfectly adequate and allows you to learn the fundamentals without being overwhelmed.
There’s a reason pressure cooking has a history—it’s efficient. It isn’t necessarily about speed alone, either. The sealed environment traps flavors, resulting in more flavorful dishes. Pressure cooking isn't a replacement for every method. Some dishes are simply better suited to slow, gentle simmering or oven roasting. The Instant Pot excels at tasks where speed and flavor concentration are desired. It's a tool, and like any tool, it performs best when used correctly.
Essential Instant Pot Safety: Avoiding Common Mistakes
Modern Instant Pots have safety mechanisms to prevent explosions, but you still need to follow the basics. The lid must be properly sealed, and the steam release valve needs to be clear of obstructions. Never force the lid open if there is still pressure inside – always allow for a full pressure release first.
I remember early on, I tried to quick release steam too quickly and ended up with a spray of hot liquid. It wasn't dangerous, but it was a good lesson in respecting the pressure. Liquid is also critical; the Instant Pot needs enough liquid to create steam, generally at least one cup, to prevent a 'Burn' message. Insufficient liquid is a common mistake. Always check the minimum liquid requirement for your recipe.
Beyond the obvious, be mindful of what you're cooking. Foods that expand during cooking, like beans, need extra room. Don’t overfill the pot—generally, fill it no more than two-thirds full. Regularly inspect the sealing ring for cracks or damage, as a faulty ring can compromise the seal. Following these precautions will minimize risk and ensure a safe pressure cooking experience.
- Ensure the lid is properly sealed.
- Check the steam release valve.
- Use sufficient liquid.
- Don’t overfill the pot.
- Inspect the sealing ring regularly.
Mastering the Basics: Pressure Cooking vs. Slow Cooking vs. Sautéing
The Instant Pot’s versatility is one of its greatest strengths, but it can also be confusing. It’s not simply a pressure cooker; it also functions as a slow cooker and a sauté pan. Pressure cooking, as we’ve discussed, uses high pressure and steam to cook food rapidly. This is ideal for tough cuts of meat, beans, and grains. Slow cooking, on the other hand, uses low heat over a long period to tenderize food and develop complex flavors.
The sauté function allows you to brown meat or vegetables directly in the Instant Pot before pressure cooking or slow cooking. This adds depth of flavor to your dishes. It’s a convenient way to reduce the number of pots and pans you need to use. It’s easy to mistake the different modes, so I find it helpful to think about the desired outcome. Do you want a quick meal? Pressure cook. Do you want a deeply flavorful stew? Slow cook. Do you want to brown meat before adding other ingredients? Sauté.
The key difference is time and technique. Pressure cooking reduces cooking times dramatically, while slow cooking prioritizes flavor development. Sautéing is a preparatory step that enhances the overall taste of the dish. Understanding these distinctions will allow you to leverage the Instant Pot’s full potential. Don't hesitate to experiment – that's how you'll truly learn the nuances of each function.
Decoding the Control Panel: Buttons and Settings Explained
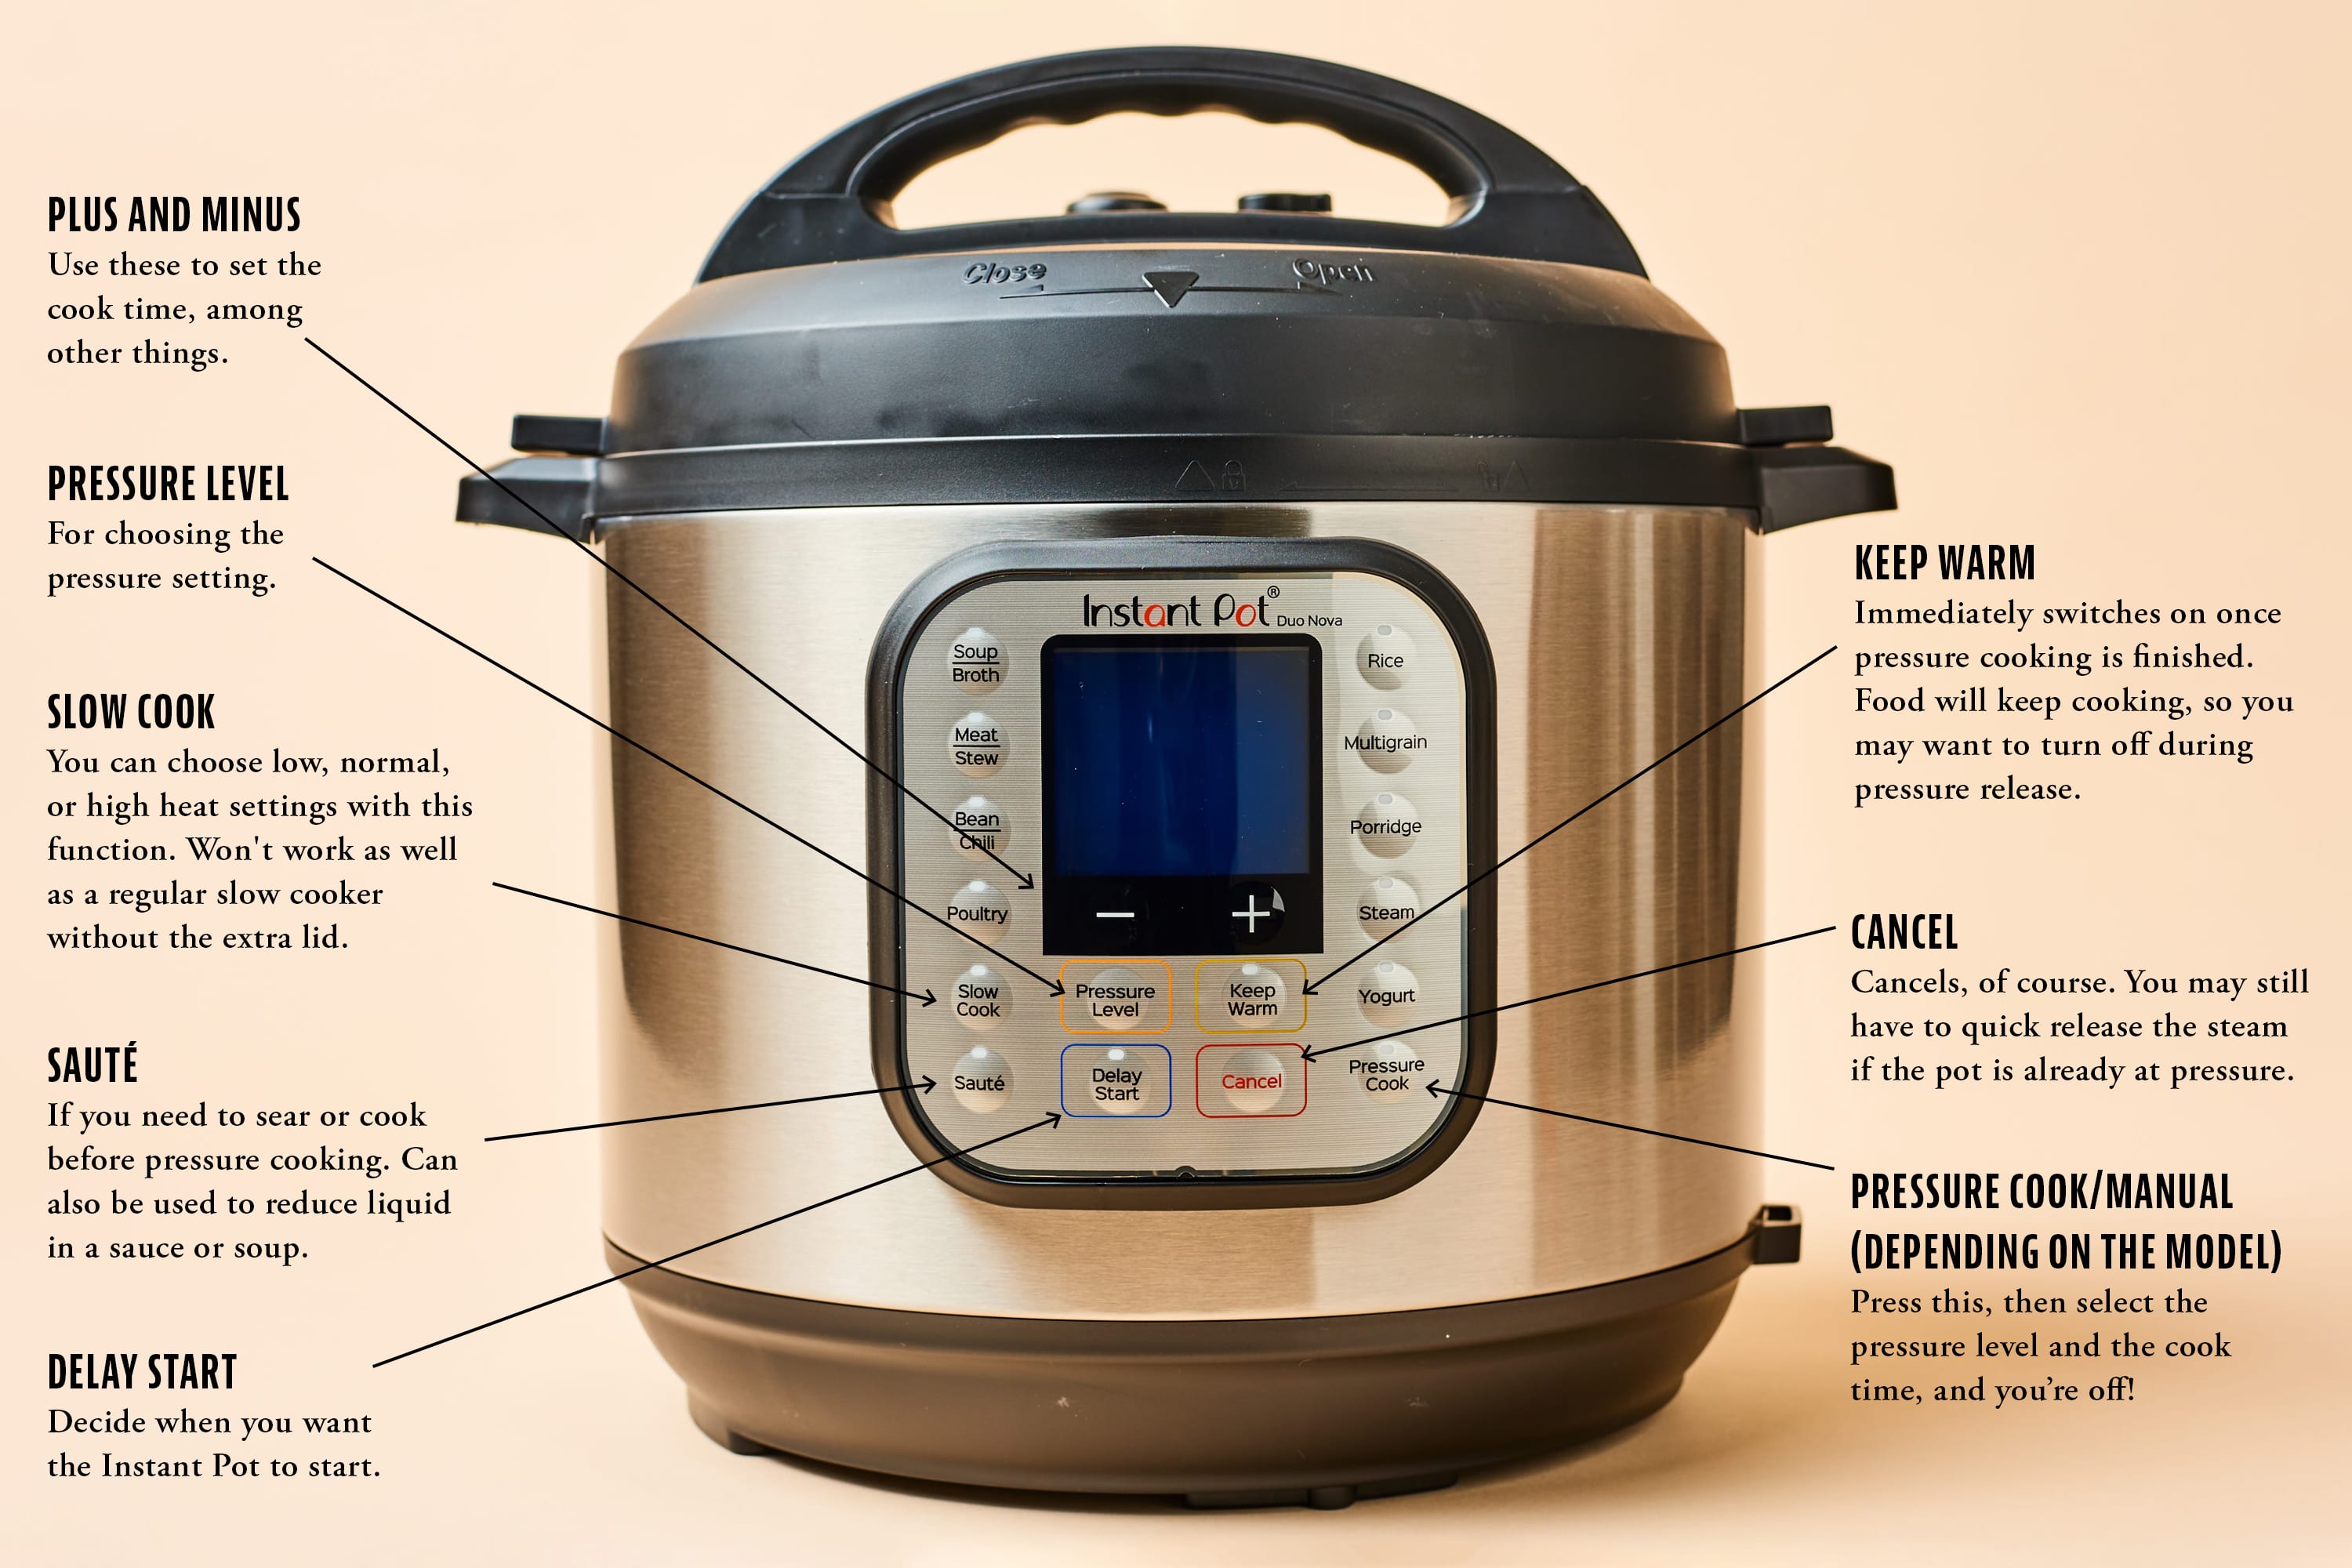
The Instant Pot control panel can seem daunting at first, but it’s logically organized. The preset buttons – Soup/Broth, Meat/Stew, Bean/Chili, Poultry, Rice, Multigrain, Porridge, Steam, and Sauté – are designed to simplify cooking common dishes. These presets automatically set the cooking time and pressure level, but I often find myself adjusting them to suit my preferences. The 'Pressure' button allows you to manually select High or Low pressure.
High pressure cooks food faster but can sometimes result in a less tender texture, while Low pressure is gentler and better suited for delicate foods. The 'Keep Warm' function automatically activates after cooking is complete, keeping your food warm until you’re ready to serve it. The 'Cancel' button stops the cooking process. It's important to understand that the preset times are guidelines, not strict rules. Learning to adjust these settings is key to mastering the Instant Pot.
The Yogurt function is a different beast entirely because it relies on fermentation temperatures rather than pressure. However, the other functions are relatively straightforward and easy to learn. Take the time to read the manual and experiment with different settings to find what works best for you.
Essential Timing: Pressure Cooking Times for Common Foods
Now for the practical part: cooking times. Here's a general guide, but remember that these are starting points. Cooking times will vary depending on the size, cut, and quantity of food. Chicken breasts typically take 8-10 minutes at High pressure, followed by a 10-minute natural pressure release (NPR). Beef chuck roast requires 60-90 minutes at High pressure, also with NPR. Dried beans need 20-40 minutes at High pressure, depending on the type.
Rice usually cooks in 3-5 minutes at High pressure, with a 10-minute NPR. Potatoes take around 15-20 minutes, and vegetables generally require 5-10 minutes. The difference between natural pressure release (NPR) and quick release (QR) is crucial. NPR allows the pressure to release gradually, resulting in more tender food. QR involves manually releasing the pressure, which is faster but can sometimes make food tougher.
For example, I often use NPR for meats and beans to ensure they are fall-apart tender. QR is fine for vegetables and grains. It's better to err on the side of slightly undercooking, as you can always add more cooking time. A meat thermometer is your friend when cooking meat—it's the most reliable way to ensure it's cooked to a safe internal temperature.
- Chicken Breasts: 8-10 minutes (High pressure, 10 min NPR)
- Beef Chuck Roast: 60-90 minutes (High pressure, NPR)
- Dried Beans: 20-40 minutes (High pressure)
- Rice: 3-5 minutes (High pressure, 10 min NPR)
- Potatoes: 15-20 minutes (High pressure)
Natural Pressure Release (NPR) vs. Quick Release (QR) Decision Matrix
| Food Type | Desired Texture | Time Sensitivity | Recommended Release Method |
|---|---|---|---|
| Beans | Tender, creamy | Low | Natural Pressure Release (NPR) |
| Meat (large cuts) | Fall-off-the-bone tender | Moderate | Natural Pressure Release (NPR) |
| Meat (smaller pieces, e.g., shredded chicken) | Easily shreddable | High | Quick Release (QR) |
| Vegetables (delicate, e.g., broccoli, spinach) | Crisp-tender | High | Quick Release (QR) |
| Vegetables (root vegetables, e.g., carrots, potatoes) | Tender but not mushy | Moderate | Natural Pressure Release (NPR) |
| Rice | Fluffy, separate grains | Moderate | Natural Pressure Release (NPR) |
| Rice (risotto style) | Creamy, slightly al dente | Low | Quick Release (QR) - with caution to prevent sticking |
Illustrative comparison based on the article research brief. Verify current pricing, limits, and product details in the official docs before relying on it.
Troubleshooting Common Instant Pot Problems
Even with careful planning, issues can arise. The dreaded 'Burn' message is a common frustration. It usually indicates insufficient liquid or food stuck to the bottom of the inner pot. To prevent this, ensure there’s enough liquid, and consider layering ingredients to prevent sticking. Deglazing the pot after sautéing—adding liquid and scraping up any browned bits—can also help. Another problem is food not reaching pressure, which usually means the sealing ring isn't seated correctly or the steam valve is set to 'venting' instead of 'sealing'.oking through. This could be due to insufficient cooking time, improper pressure release, or an inaccurate pressure setting.
A lid that won’t seal is often caused by a dirty sealing ring or a misaligned lid. Make sure the sealing ring is clean and properly seated in the lid. A clogged steam release valve can also prevent the pot from reaching pressure. Regularly clean the valve to ensure it’s free of obstructions. It's also worth noting that sometimes, the float valve can get stuck in the 'venting' position, preventing pressure buildup.
Regular cleaning and maintenance are essential. Wash the inner pot, lid, and sealing ring after each use. Periodically inspect the steam release valve and float valve for clogs. Don't be afraid to consult online forums and resources – there's a large and helpful Instant Pot community willing to share their expertise. I’ve found a lot of solutions to common problems by searching online.
- 'Burn' Message: Insufficient liquid, food stuck to bottom.
- Food Not Cooking: Insufficient time, improper release, inaccurate pressure.
- Lid Not Sealing: Dirty sealing ring, misaligned lid.
- Clogged Steam Release Valve: Requires regular cleaning.
Beyond the Basics: Recipes to Get You Started
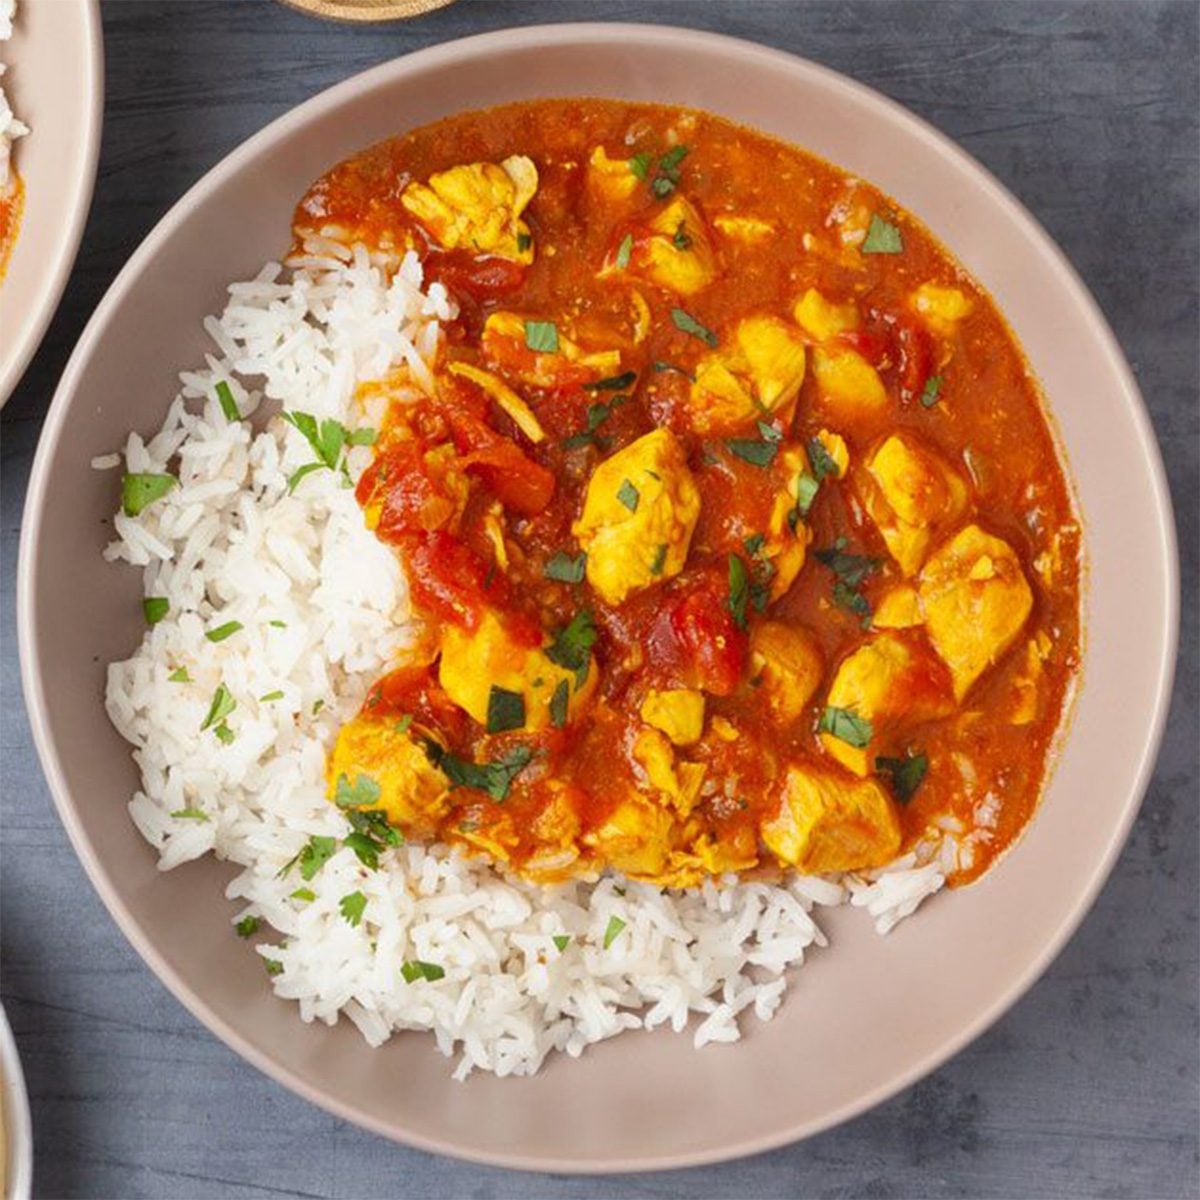
Let’s put theory into practice with a few simple recipes. First, Chicken and Rice: Combine 1 cup rice, 2 cups chicken broth, 1 lb chicken breasts, and seasonings in the Instant Pot. Cook on High pressure for 8 minutes, followed by a 10-minute NPR. Next, Hearty Bean Chili: Sauté 1 chopped onion and 2 cloves garlic in the Instant Pot. Add 1 lb ground beef, 1 can diced tomatoes, 1 can kidney beans, 1 can black beans, and chili seasoning. Cook on High pressure for 20 minutes, followed by a QR.
Finally, Creamy Potato Soup: Add 2 lbs cubed potatoes, 4 cups chicken broth, 1 chopped onion, and seasonings to the Instant Pot. Cook on High pressure for 15 minutes, followed by a QR. Mash the potatoes and stir in 1/2 cup cream. These recipes are designed to be easy and forgiving, perfect for beginners. They demonstrate the versatility of the Instant Pot and showcase how quickly you can create delicious, home-cooked meals.
For more recipe inspiration, I highly recommend checking out Kristine's Kitchen Blog (https://www.kristineskitchenblog.com/instant-pot-guide/). There you’ll find a wealth of recipes and helpful tips to further your Instant Pot journey! Remember, the key to success is practice and experimentation. Don’t be afraid to try new things and adapt recipes to your liking.
We introduce and present to you the Electric Pressure Cooker Tips & Recipes guide that is packed with recipes of common Ugandan dishes, and tips on how to choose, use and Maintain your appliance(EPC).
— National Renewable Energy Platform (NREP) 🇺🇬 (@NREP_Uganda) August 11, 2025
Download and get your copy now via: https://t.co/YBOJPDvPVT@UKMECS… pic.twitter.com/tSNFuC1GBH
No comments yet. Be the first to share your thoughts!