
Instant Pot Essentials: Beyond Basic Pressure Cooking
The Instant Pot is a versatile kitchen appliance that can sauté, steam, slow cook, and even make yogurt. Models like the Duo, Pro, and Max offer different features, but the main benefits are speed, convenience, and versatility.
This guide focuses on techniques to help you get the most out of your Instant Pot. It can drastically reduce cooking times for recipes that usually take hours; for example, a pot roast that takes 8 hours in a slow cooker can be ready in under two hours.
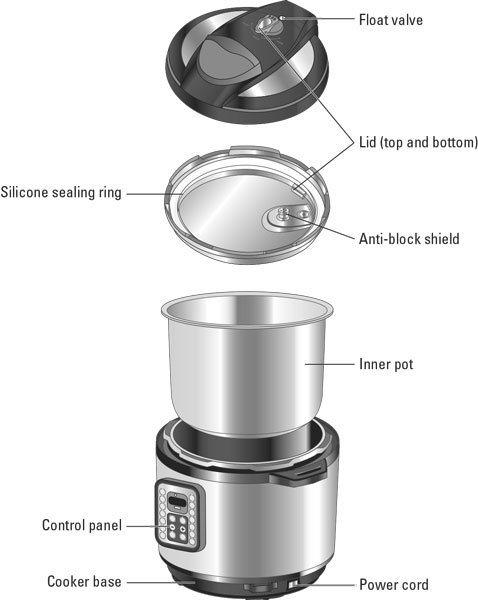
Knowing the Instant Pot's parts helps you use it confidently. The inner pot is typically stainless steel. The lid has the sealing ring for pressure and the steam release valve for pressure release.
Natural Pressure Release vs. Quick Release: Knowing When to Wait
Natural pressure release (NPR) lets pressure dissipate on its own (10-30 minutes or more), while quick release (QR) involves manually opening the steam release valve.
NPR works best for tough meats and beans, promoting even cooking and preventing dryness. QR is better for quick-cooking items like vegetables and fish, but it carries risks.
Be cautious when using QR on starchy foods like potatoes, pasta, or oatmeal, as they can cause splattering. While NPR is often seen as safer, QR is fine for suitable foods and saves time. The choice depends on the recipe and what you want to achieve.
Sauté Function Secrets: Building Flavor Before Pressure
Use the sauté function before pressure cooking to build flavor. Browning meats creates savory notes through the Maillard reaction, and heating spices in oil releases their aromas and tastes.
Sautéing aromatics like onions, garlic, and celery first builds a flavorful base for dishes. A common issue is the 'burn' notice, often caused by food sticking to the pot after sautéing.
Deglaze the pot after sautéing by adding liquid and scraping up browned bits to prevent burning. You can also use the sauté function after pressure cooking to reduce sauces or thicken stews.
Liquid Ratios: Avoiding the Dreaded 'Burn' Notice
The 'burn' notice, indicating food sticking and scorching, is a common frustration. Using the correct liquid ratio prevents this. A 6-quart Instant Pot generally needs at least 1 cup of liquid to build pressure.
This is a starting point; thicker recipes like chili or stew need more liquid. Starchy foods like pasta or rice also require extra liquid to avoid sticking. Beans need more liquid than vegetables.
A good rule of thumb is to ensure the liquid covers at least half the ingredients. If you get a 'burn' notice, release pressure, carefully open the lid, add more liquid, and scrape the bottom.
- If you get a burn notice:
- Release the pressure immediately.
- Carefully open the lid.
- Add more liquid (at least 1/2 cup).
- Scrape the bottom of the pot to dislodge stuck food.
- Reseal the lid and continue cooking.
Instant Pot Cooking Guidelines by Food Type
| Food Type | Liquid Ratio | Potential Burn Risk | Notes |
|---|---|---|---|
| Beans | High | Medium | Generally require ample liquid for proper cooking and to prevent scorching. Soaking beforehand can reduce cooking time. |
| Rice | Medium | Low | Liquid ratios are crucial; too little leads to burning, too much to stickiness. White rice typically needs less liquid than brown. |
| Stew/Soup | High | Low | Liquid level influences thickness. Adjust based on desired consistency. Root vegetables may require longer cooking times. |
| Yogurt | Low | Low | Yogurt utilizes a 'no pressure' setting; maintaining temperature is key, not pressure. Requires a starter culture. |
| Chicken (pieces) | Medium | Medium | Sufficient liquid prevents sticking and ensures even cooking. Browning the chicken before pressure cooking enhances flavor. |
| Beef (tough cuts) | High | Medium | Longer cooking times and higher liquid ratios are needed to tenderize. Consider searing before pressure cooking. |
| Vegetables (steaming) | Low | Low | Minimal liquid is needed for steaming, preserving nutrients. A steaming rack is recommended. |
| Grains (Quinoa, Barley) | Medium | Low | Similar to rice, precise liquid ratios are important. Quinoa generally cooks faster than barley. |
Illustrative comparison based on the article research brief. Verify current pricing, limits, and product details in the official docs before relying on it.
Layering Ingredients: The Right Order Matters
Layering ingredients correctly ensures even cooking. Put liquids in first, then dense foods needing longer cooking, and delicate foods on top. This prevents over or undercooking.
Don't put potatoes on the bottom and beans on top; potatoes need longer cooking and should be closer to the heat. Place vegetables above meats to avoid them becoming mushy.
Proper layering significantly impacts the final result, ensuring all ingredients cook perfectly and flavors combine well.
Pressure Cooking Times: A Guide to Doneness
Cooking times depend on food, quantity, and doneness. General guidelines: chicken 6-8 min/lb, beef 20-30 min/lb, dried beans 20-40 min, rice 3-5 min, vegetables 1-3 min. Adjustments may be needed.
Altitude affects cooking times; higher altitudes need longer cooking due to a lower boiling point. Consult an altitude adjustment chart; for example, at 5,000 feet, increase times by 5-10%.
Use a meat thermometer for safe internal temperatures. Relying only on cooking times is risky, as food continues to cook after pressure release. It's better to slightly undercook than overcook.
Yogurt, Cheesecake, and Beyond: Expanding Your Instant Pot Repertoire
Beyond soups and stews, the Instant Pot makes yogurt and cheesecake. Its yogurt function maintains a consistent temperature for culturing milk, and adapted cheesecake recipes yield moist results.
You can approximate sous vide cooking by heating water with the sauté function and maintaining temperature with keep-warm, allowing precise cooking of delicate items.
undefined It’s a tool that encourages culinary creativity and allows home cooks to experiment with new techniques and recipes.
Cleaning and Maintenance: Keeping Your Pot Happy
Proper cleaning and maintenance are essential for prolonging the life of your Instant Pot. The inner pot is dishwasher-safe, but hand washing is recommended to prevent discoloration. The lid should be washed with warm, soapy water, paying attention to the sealing ring.
The sealing ring is prone to absorbing odors, so it’s a good idea to have multiple rings on hand – one for savory dishes and one for sweet dishes. The steam release valve should be cleaned regularly to prevent clogging. A buildup of food particles can affect its performance.
The sealing ring should be replaced periodically, typically every 12-18 months, or more frequently if it becomes cracked or damaged. Regular cleaning prevents buildup and ensures that your Instant Pot continues to function optimally.
Troubleshooting Common Instant Pot Problems
Even with careful attention, problems can arise. The "burn" notice, as previously discussed, is a common issue. Another frequent problem is the lid not sealing, which can be caused by a damaged sealing ring, debris on the sealing surface, or improper lid placement. Ensure the sealing ring is properly seated and the lid is securely locked.
If food isn’t cooking properly, double-check the liquid ratio and cooking time. Altitude adjustments may also be necessary. If the Instant Pot won’t come to pressure, ensure the steam release valve is in the sealing position and there’s sufficient liquid in the pot.
Being prepared with solutions to these common issues will make your Instant Pot experience much more enjoyable. Online forums and communities dedicated to Instant Pot cooking are also valuable resources for troubleshooting and finding answers.
Advanced Techniques: Sous Vide and Beyond
For the more adventurous cook, the Instant Pot offers opportunities to explore advanced techniques. While not a true sous vide machine, the Instant Pot can be used to approximate the process by utilizing the sauté and keep-warm functions to maintain precise temperatures. This is suitable for cooking delicate proteins like salmon or chicken breast.
Another advanced technique is making complex stocks and broths. The pressure cooker extracts maximum flavor from bones and vegetables in a fraction of the time compared to traditional methods. This results in rich, flavorful stocks that can be used as a base for soups, sauces, and stews.
Mastering these advanced techniques unlocks the full potential of the Instant Pot, transforming it from a convenient appliance into a versatile tool for serious cooks. It’s about pushing the boundaries of what’s possible and experimenting with new culinary horizons.
No comments yet. Be the first to share your thoughts!